Quality assurance and traceability are vital for die casting foundries. Numerous test methods are available in order that companies can control the extent to which their products meet the requirements of the customers. As requirements for die cast parts continue to grow, also the requirements for testing technology are increasing.
 Modern die casting foundries are certified according to a quality management system such as the DIN ISO 9001 standard, for example. Such a system documents the ability of these companies to meet customer specific and regulatory requirements and is an important prerequisite for getting orders. Topics such as “quality assurance” and “traceability” are of central importance. The first issue relates to controlling the entire production process with various test methods, documenting the test results, and ultimately making sure that only those cast parts are delivered which meet the quality-related requirements of the customers, and thus only good parts in terms of quality leave a die casting foundry. If, nonetheless, a die casting foundry has to deal with customer complaints, it is helpful to trace back the production process of a complained part up to the origin of the processed raw materials and thus being able to detect the cause of the fault and its source [1].
Agreements
Quality assurance comprises the entire production process, from testing the incoming raw materials at the receiving area via all production and processing steps and the setting of the machines used for production up to the final check and the shipment of the finished cast parts. Usually, die cast parts are randomly inspected during production, but sometimes also a 100-percent quality testing is carried out. This is the case, for example, when the topography of functionally-relevant surfaces of finished die cast parts has to be checked. For this purpose, the Fraunhofer Institute for Physical Measurement Techniques (IPM), Freiburg im Breisgau/Germany, has developed the optical 3D inline inspection system “HoloTop”. It is based on digital holographic microscopy, detects deburring defects, rounding defects and other surface defects of precision-machined die cast parts and can be integrated into the production line [2]. Details regarding the extent of a quality test, its procedures, the devices used for it and the test conditions are usually determined by a die casting foundry together with its customer before accepting an order. Occasionally, also details concerning flaw size and fault rate as well as a qualitative evaluation of failure rates are agreed. In this way, any possible later discrepancies derived from cross-checks by the customer can be avoided. Test protocols are incorporated into the documentation of the foundry and are handed to the customer to inform him about the tests and their results.
Fault causes
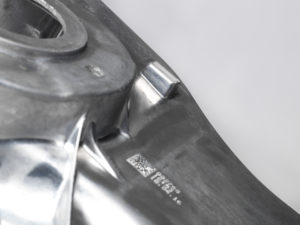
Despite a high production accuracy, die casting foundries have always take into consideration that faults may occur in the production, for example due to an inappropriate chemical composition of the melt, the modification of machine and process parameters and due to wear on the die casting moulds. In the course of numerous casting cycles and the associated temperature changes, microcracks can form in the surface of the mould which then generate fine burrs on the surface of the cast parts. Also, when handling the cast parts, scratches, impact marks or other surface modifications can happen. Last but not least, also human inadequacies have to be considered.
Test technology and test characteristics
The test equipment differs from die casting foundry to die casting foundry. Usually, test devices are available to measure certain mechanical properties such as strength and hardness of casting materials and finished parts [3]. By means of a spectrometer analysis and a density measurement it is possible to determine if the melt to be cast has the required composition and consistency. Typical properties of cast parts which can be controlled by non-destructive test methods are the dimensions of the cast parts and their surface quality. For this purpose, 3D coordinate measuring machines, roughness measuring devices and CNC measuring microscopes are used. It is often the case that also the interior of die cast parts has to be tested. In this context, among other things, particular attention is paid on bubbles which occur when air or other gases dissolved in the melt can not escape during the solidification process. If such a cast part is subjected to a heat treatment, the gases trapped under the cast part’s surface expand, whereupon bulges, called “blisters”, appear on the surface which, inter alia, affect negatively the mechanical properties of the cast part [4]. The Technology Center Production and Logistics Systems (TZ PULS) in Dingolfing, a branch office of the Landshut University of Applied Sciences, Germany, has developed a pilot plant which is able to automatically detect blisters. This measurement option is an important prerequisite for the industrialized production of die cast components made of aluminium alloys.Radioscopy is used to visualize those defects which may be within the material: A radiographic examination using an X-ray device provides information on the presence, size and distribution of cavities as well as gas and other inclusions. It is also possible to receive statements about the wall thickness of castings and their inner contours. The further development of X-ray technology means that smaller and smaller defects can be reliably detected and process-integrated in-line X-ray examinations will complement the previous classical radioscopy examination [5]. The presence of cracks in die cast parts can also be controlled by ultrasonic testing and dye penetration testing. For the sake of completeness it should be mentioned that even a visual examination can provide information about defects. If pressure tightness is required for cast parts, the die casting foundry and the customer have to make particular agreements on test methods and the test extent, as this requirement always refers to specific gases or liquids as well as environmental conditions [1].
Traceability
For a long time, cast parts had been optically marked, for example by printed on barcodes. With a view to the digitization of foundry processes, the radio-based RFID technology is becoming more and more interesting. By means of the “Cast Tronics” process developed by the Fraunhofer Institute for Manufacturing Technology and Applied Materials Research (IFAM) in Bremen/Germany and the car manufacturer Audi, specially encapsulated RFID transponders can be automatically fed into the die casting machine where they are then cast into the surface of the die cast parts. “With RFID, a component can not only be precisely identified, but also important information about the production process can be stored and made available for subsequent processes”, emphasizes Thomas Rahn, Project Manager at IFAM, some advantages of this process. The embedded RFID transponders also protect castings against counterfeiting [6].
Quality factor and OEE
Qualitatively defective parts and the parts which have to be reworked represent a loss of quality. A measure of this is the numerical ratio of the qualitatively acceptable parts, i.e. the yield, to the total amount of produced parts, which is referred to as quality factor, quality rate or quality grade and is taken into account in the calculation of the Overall Equipment Effectiveness (OEE) [7]. Special software with process data and time recording makes it possible to determine the quality factor and pass it on to a production data acquisition system for further evaluation.
Quality consciousness
The increasing demands on the quality of die cast parts have the consequence that the test methods are continuously being further developed. However, despite all future success in this field and all test systems already in use, the quality assurance of a die casting foundry depends, above all, on quality-conscious and well-trained employees.


