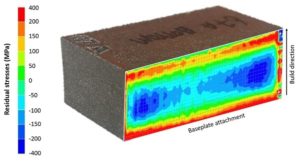
Residual stresses are simply stresses retained within a stationary body and at equilibrium with its surroundings. There are three primary mechanisms in which residual stresses enter into a body namely thermal, chemical and mechanical processes [1]. Thermal processes introduce residual stresses through thermal gradient resulting from inhomogeneous cooling across the body. This can be commonly seen in welded structures where large thermal stress gradients are introduced through intensive local heating and subsequent cooling. Additive manufactured parts also suffer from residual stresses due to the thermal misfits being introduced through introduction of local intense heat source during printing, see Fig. 1. Chemical processes results in the precipitation of semi coherent precipitates through introduction of one or more chemical species into the alloy. Nitriding in steel is an example of a chemical process in which residual stresses are being imbued in the near surface region due to formation of nitrides.Mechanical processes introduce residual stresses into the body by developing plastic deformation into the materials. These processes can be categorised based on the extent by which residual stresses are introduced into the material, near surface (< 1 mm from free surface) or deep into the bulk (through thickness). Surface enhancement techniques such as shot peening and deep cold rolling on the other hand introduce residual stresses only to the near surface region for fatigue life improvements. Cold working processes such as drawing and bending belong to the latter where plastic deformation is expected to occur throughout the body resulting in bulk residual stresses.
Role of residual stresses in mechanical performance
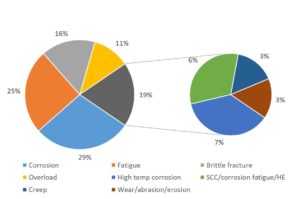
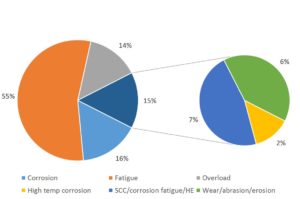
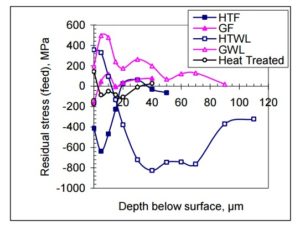
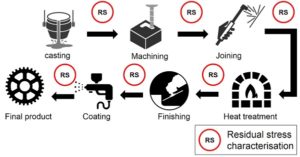
Residual stresses are known to be responsible for various engineering problems like distortions, cracks or delamination (particularly in additive manufacturing) when their magnitudes exceed the ultimate strength and fatigue. As a result, manufacturing processes were often controlled to minimise the introduction of undesirable residual stresses. Post-processing heat treatments are also commonly utilised to eliminate residual stresses. One in four engineering components suffer from fatigue failure during its service lifetime [2]. The figure is even higher in the aero industries (55%) where components’ strength to weight ratio is optimised [2]. Fig. 2 shows the breakdown on the frequency of failure mechanisms in engineering and aircraft component. The number of residual stress related mechanical failures have also grown steadily past few decades as shown in a study looking into the ASM Failure Analysis Database [3]. These figures suggest that there are many opportunities for value creation from residual stress engineering. Indeed, the US Air Force saved nearly $300 million in engine repairs through increased precision in lifing its turbine discs [4] enabled by, among other measures, residual stress management and characterisation [5].Comprehensive studies in the role of residual stresses in fatigue were published as far back as two decades ago [6]. These studies concur that the effects of residual stresses on fatigue performance can be observed during initiation and propagation of fatigue cracks. Compressive residual stresses are generally known to improve fatigue properties by delaying crack initiation and retard short crack growth [7]. Conversely, tensile residual stresses are undesirable as they promote crack initiation and propagation. Tensile residual stresses are inevitable consequences of some manufacturing processes. In machining operations for instance, localised heat being generated at the point of contact between the cutting tool and the workpiece result in the accumulation of tensile residual stresses at the machine surfaces. These stresses may be as high as the yield strength for hard-to-machine alloys with low thermal conductivity that promote large thermal gradient such as nickel-based superalloys [8]. Compressive residual stresses on the other hand are usually built into the component through carefully designed processes. Various peening techniques for instance can be employed to introduce compressive residual stresses in the near surface by applying concentrated load on the surface (through a variety of mechanisms). The magnitude of the fatigue life extension being produced by these techniques is intimately linked to the depth-distribution of compressive residual stresses (i.e. residual stress profiles), see Fig. 3. Example of manufacturing route showing that all processes inevitably introduce residual stresses through mechanical or thermal inputs.
Residual stress characterisation techniques
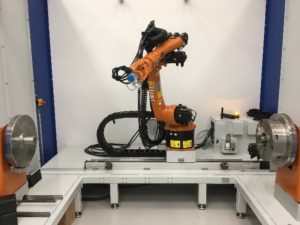
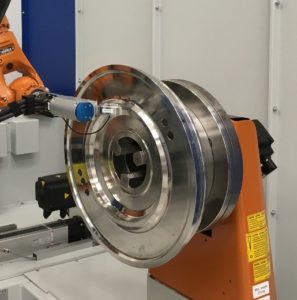
Today, there are many characterisation techniques available for residual stresses. These techniques can be broadly divided into two categories namely destructive and non-destructive. The destructive techniques rely on the measurement of relieved strain after cutting or drilling operations. One of the earliest method being developed was based on hole-drilling pioneered by Mathar in the 1930s [10]. Hole-drilling is now a mature technology and has been defined in an international standard [11]. The accuracy and repeatability of hole-drilling measurements have gone through significant improvements since it was first conceptualised. This was enabled by technological development in drilling, strain measurement (strain gauges, optical techniques, Electronic Speckle Pattern Interferometry (ESPI) and digital image correlation) and finite element based stress computations [12]. Cutting and slitting techniques have also been used for residual stress measurements using the same principle of mechanical strain relieving. The main advantage of destructive techniques are their relative low cost and ability to characterise bulk residual stresses. Several non- destructive techniques infer residual stresses through specific relationships between strain and material properties such as acoustoelastic and piezoresistivity effect in ultrasonic and eddy current residual stress assessment respectively. These techniques however, are largely limited by selectivity as the readings are influenced by a host of other factors besides residual stresses [5]. X-ray diffraction (XRD) techniques measure shifts in the diffraction angle, 2θ that can be related to lattice spacing, d (i.e. strain) according to Bragg’s Law. Unlike other non-destructive techniques, XRD does not suffer from selectivity issues as the lattice spacing can be directly linked to strain. This makes the technique suitable for residual stress characterisation for polycrystalline materials (most metallic alloys fall under this category). One of the main limitations of this technique is its limitations to characterising residual stresses within a few microns from the surface due to low penetration of X-ray in most metals. There are several international standards available for residual stress characterisation via XRD and one that is widely used is the European standard, EN 15305:2008. One of the common accreditations available to measurement laboratories is ISO17025. Such accreditation is particularly important to industry because of the need for clear traceability and quality assurance for each measurement. There are currently several centres around the world with ISO17025 accreditation for measurements of residual stresses using XRD. Advanced Remanufacturing and Technology Centre (ARTC) in Singapore is one of such centres serving its customers in Asia Pacific and beyond. One of its latest equipment, robotic XRD, allow for measurement of large components (see Fig. 4).
Moving forward – residual stress in Industrie 4.0
Residual stress characterisation has largely been confined to the laboratories due to its slow speed and relative complexity (rendering some techniques sensitive to environment). Industrie 4.0 focuses on generating data during the manufacturing itself to enable close-loop feedback (adaptive process), better quality management and self-optimisation of yield. Residual stresses are being introduced at different stages of manufacturing right from casting all the way to surface enhancement and coating (see Fig. 5). Knowing residual stresses at each stage helps in reducing scrap rate as well as minimising rework across the value chain by identifying issues at its source. The benefit will be particularly seen in high-mix-low-volume operations where visibility of the residual stresses through the production process helps in optimising the process parameters in real-time. Currently, residual stresses are characterised from relatively small sample sizes translating to high uncertainties. This in turn results in a too conservative lifing approach with unnecessarily high safety factor. The ability to increase (or even eliminate) sampling reduce such uncertainty allowing for a more precise lifing that translates to cost savings by extracting more useful lives from each component.
Conclusions
Residual stresses present a challenge to manufacturers particularly because they are not easily detected and have severe implications on mechanical performance. When carefully managed and controlled however, residual stresses can be exploited for improvements on fatigue performance which is a major failure mechanism in engineering components. The ability to alter as well as characterise residual stresses represent big opportunities for cost reductions.
References
[1] H. Bhadeshia and P.J.Withers, “Residual stress Part 2 – Nature and origins,” Materials Science and Technology, vol. 17, pp. 366-375, 2001.
[2] S.J.Findlay and N. Harrison, “Why aircraft fail,” Materials today, vol. 5, no. 11, pp. 18-25, 2002.
[3] E. Fairfax and M. Steinzig, “A Summary of Failures Caused by Residual Stresses,” in Residual Stress, Thermomechanics & Infrared Imaging, Hybrid Techniques and Inverse Problems, 2016.4] “www.defense-aerospace.com,” [Online]. Available: http://www.defense-aerospace.com/articles-view/release/3/103394/usaf-program-saves-%24300m-on-engine-repairs.html. [Accessed 30 June 2017].
[5] P. Nagy, “Opportunities and Challenges for Nondestructive Residual Stress Assessment,” Review of Quantitative Nondestructive Evaluation, vol. 25, 2006.
[6] L. Wagner, “Mechanical surface treatments on titanium, aluminum and magnesium alloys,” Materials Science and Engineering: A, vol. 263, no. 2, pp. 210-216, 1999.
[7] K. Soady, “Life assessment methodologies incorporating shot peening process effects: mechanistic consideration of residual stresses and strain hardening,” Materials Science and Technology, vol. 29, no. 6, pp. 637-651, 2013.
[8] W.Li, P.J.Withers, D.Axinte, M.Preuss and P.Andrews, “Residual stresses in face finish turning of high strength nickel-based superalloy,” Journal of Materials Processing Technology, vol. 209, pp. 4896 – 4902, 2009.
[9] Y. Guo and A. Warren, “The basic relationship between residual stress profile patterns and fatigue life of precision machined surfaces in rolling contact,” Advances in X-ray Analysis, vol. 52, © ICDD 2009. This material is used by permission of ICDD. [10] J. Mathar, “Determination of Initial Stresses by Measuring the Deformation Around Drilled Holes,” Transactions ASME, vol. 56, no. 4, pp. 249-254, 1934. [11] ASTM E837 – 13a, “Standard Test Method for Determining Residual Stresses by the Hole-Drilling Strain-Gage Method,” ASTM International, 2013.[12] G. Schajer, “Advances in Hole-Drilling Residual Stress Measurements,” in XIth International Congress and Exposition, Orlando, 2008. [13] K. Soady, B. G. Mellor, G. D. West, G. Harrison, A. Morris and P. Reed, “Evaluating surface deformation and near surface strain hardening resulting from shot peening a tempered martensitic steel and application to low cycle fatigue,” International journal of fatigue, vol. 54, pp. 106-117, 2013.


